Collection and Processing of Samples for Parasitology
Feces:
Collection
Ideally, feces should be processed as soon after passage from the animal as possible.
Feces should be collected in airtight containers to prevent desiccation.
If the processing of a fecal specimen must be delayed, it may be:
refrigerated (but not frozen) for several days ( not recommended for samples with live larvae that you intend to examine using the Baermann technique).
fixed, e.g., 10% formalin (5% formalin-saline is better for protozoal cysts). Add fixative to feces at a ratio 3:1 (v:v) and mix well. (Not for Baermann technique.)
If an animal has been treated with anti-diarrhea preparations containing bismuth or kaolin, mineral oil, oral contrast material (barium) for radiology (all of these materials float) or antibiotics, then parasites may be difficult or impossible to find. Therefore, repeat the fecal exam 5-10 days after treatment withdrawal.
Processing
First, examine the feces for blood and other clinical signs, then examine the inside of container for tapeworm segments (which are motile and may move away from the fecal mass).
Many techniques have been devised to increase the likelihood that parasites will be detected in a particular sample of feces. The merits and limitations of representative fecal processing techniques are summarized in the table on the next page. Step-by-step directions for performing the various methods are on the following pages.
Repeat Fecal Exams are suggested in the following situations:
Clinical signs suggest parasitism, but initial fecal exam was negative. Repeat in 2 or 3 days. Repeat for a total of 3 times within 7 to 10 days, if no parasites are seen it is likely the animal is not infected.
Following specific therapy of a parasitic infection, have owner submit a fecal specimen 2 weeks following the last administration of drug. (This is late enough that all eggs and cysts will have been cleared from the gut, but , for most parasites, too early for re-infection to be showing up.)
Practical No. 2
1. Direct Smear Fecal Exam
Place a small amount of feces on a microscope slide.
Add a drop of liquid to the feces and mix thoroughly. The type of liquid added depends on what you hope to accomplish with the technique. If you are examining a liquid fecal sample for the presence of protozoan trophozoites (live active protozoa) then use saline (if any extra liquid is needed).If you are looking for helminth eggs and protozoan cysts in a small sample (bird droppings, rectal smear, etc) then either water or iodine may be used.
Cover with a cover slip. Move the cover slip around until it lays flat. You should be able to read through the smear (light from the microscope must be able to pass through the sample in order for you to examine it).
Examine the slide using the 10X objective, and then go over it with the 40X objective.
NOTE: Because this technique examines only a very small amount of feces, it should only be used in the following circumstances:
Liquid feces where protozoan trophozoites may be present.*
Fecal samples where the amount of feces obtained is too small to handle with any other technique.*
As an adjunct to a flotation technique where you are looking for eggs that do not float. (In this case you probably would be better off running an ethyl acetate sedimentation and examining the resultant pellet using the direct smear method.)
Practial No. 3
2. Ethyl Acetate Sedimentation Method
1. Pass a grape-sized piece of feces through a sieve into about 9 ml of water and pour into a 15 ml centrifuge tube.
2. Add about 3 ml of ethyl acetate, plug the tube with a rubber stopper and shake the tube vigorously.
CAUTION: Test materials before placing Ethyl Acetate into them. This solvent will dissolve many types of plastic!! The white plastic centrifuge tubes (polypropylene) used in the lab are OK, but clear hard plastic tubes and the disposable polystyrene cups will dissolve.
3. Remove the rubber stopper and centrifuge the tube (1500-2500 rpm) for 1 to 2 minutes.
4. Using a stick, "ring" the plug of fat at the water - ethyl acetate interface (the plug adheres to the side of the tube and must be detached before the liquid contents of the tube can be poured off).
5. Pour off the supernatant, being careful to leave the pellet at the bottom of the tube intact. (Flush the ethyl acetate down the sink with plenty of water.)
6. Transfer some of the sediment from the bottom of the tube to a slide and examine. The sediment can be transferred in several ways: 1) If some liquid remains, the pellet can be resuspended and a drop transferred with a pipette. 2) Add a drop of iodine to the pellet to resuspend it and then transfer with a pipette. 3) Use a stick to remove some of the pellet and smear it on a slide as you would when making a direct smear.
Practical No.4
3. Stoll Egg Counting Technique
This is a method for determining the number of nematode eggs per gram of feces in order to estimate the worm burden in an animal. The advantage of this technique is that it requires no specialized equipment, the disadvantage is the counting takes a long time because of the amount of extra (non-egg) material on the slides.
Weigh out 3 grams of feces.
Measure out 42 ml of water and place it into a dish. Using a tongue depressor, push the 3 grams of feces through a sieve into the water. Lift the sieve and hold over the dish. Push out any remaining water from the feces.
While stirring the water-feces mixture, take 0.15 ml of the suspension and spread over 2 slides. Cover each slide with a long coverslip (or 2 regular size coverslips).
Examine both slides for worm eggs, the total number of eggs counted X 100 represents the number of eggs per gram of feces.
Since 0.15 ml is 1/300 of 45 ml (42 ml water and 3 gm feces) then the number of eggs in 0.15 ml X 100 is equal to 1/3 of the total number of eggs in the original 3 grams and thus equal to eggs per gram (EPG).
Practical No. 5
A. Saturated Salt Flotation
Method
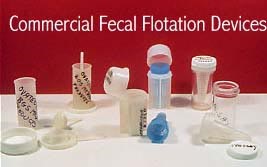
A small amount of feces (a pea to grape size, about 1 gram) is mixed with about 10 ml of flotation medium and poured into a tube so that the liquid comes just over the top of the tube. The mixture is allowed to sit for about 15 min while the eggs float to the top and the rest of the fecal matter sinks to the bottom. A cover slip can be placed on the top of the tube before the incubation period starts or can be applied at the end. The cover slip is then transferred to a microscope slide.
Commercial devices have a sieve incorporated into the tube to keep large particles from floating up and sticking to the coverslip. See image below of some commonly available commercial fecal devices.
USES: This method will recover most nematode eggs and protozoan cysts, however many trematode and cestode eggs, as well as Giardia cysts will not be recovered.
Specific Gravity of Some Helminth Eggs as Determined Using Sucrose Density Gradient Centrifugation
Species
Mean Specific Gravity
Range
Ancylostoma caninum
1.0559
1.0549 - 1.0573
Toxocara canis
1.0900
1.0791 - 1.0910
Toxocara cati
1.1005
1.1004 - 1.1006
Taenia sp.
1.2251
1.2244 - 1.2257
Physaloptera sp.
1.2376
1.2372 - 1.2380
ZnSO4 Solution
1.18
Saturated salt or sugar
1.20
B. Modified Wisconsin Sugar Flotation Method
This method of determining the EPG is probably the most commonly used method. First used by the University of Wisconsin's Parasitology Laboratory, it is a modification of the Stoll technique. It is the most accurate as it counts all the eggs in 3 grams of feces and, because it is a flotation method, it has little debris to interfere with the count. However, if the EPG is high, there may be too many eggs to count.
Fill a 15 ml test tube with 10 ml of Sheather's solution.
Weigh 3 grams of feces and place into a cup.
Pour the Sheather's solution from the test tube into the cup and mix well.
Place a funnel into the test tube tube, place a strainer into the funnel and pour the fecal-sugar solution mixture through the strainer into the test tube. Using a tongue depressor, squeeze the liquid out of the feces that is left in the strainer.
Centrifuge the tube for 2 to 4 minutes.
Fill the tube to just over the top with Sheather's solution and place a cover slip onto the meniscus.
Let sit for about 5 minutes, then remove the cover slip and place on a slide.
Examine the entire cover slip and count the number of eggs that you find.
The number of eggs counted is the number per 3 grams of feces, so divide by 3 to find the EPG.
Sheather's Solution Preparation: Add 454 gm (1 lb) of table sugar to 355 ml of very hot water. Stir until dissolved and allow to cool. This solution will grow mold if left out, so keep refrigerated and use quickly.
Zinc Sulfate Centrifugal Flotation
Fill a 15 ml centrifuge tube with ZnSO4 solution (1.18 specific gravity) and pour into a glass dish.
Using a tongue depressor, push the feces (2 to 3 grams, a piece the size of a grape) through the strainer into the ZnSO4 solution in the dish.
Using a funnel, pour the ZnSO4-fecal mixture back into the centrifuge tube.
Centrifuge for 2 min at high speed (1500 - 2000 rpm).
Using a headed-rod or loop, remove a sample from the surface of the solution and place on a microscope slide.*
Add a drop of iodine solution (to stain the cysts and ova) and a coverslip.
Examine at 10X.
*Note: You may have to take several samples with the rod or loop to get enough material to examine, you want the equivalent of a large drop on the slide.)
Practical No. 6
4. McMaster Egg Counting Technique
Another method for determining the number of nematode eggs per gram of feces in order to estimate the worm burden in an animal. The advantage of this method is it is quick as the eggs are floated free of debris before counting, the disadvantage is you must use a special counting chamber.
Weigh out 2 grams of feces.
Pass the feces through a sieve into a dish containing 60 ml of ZnSO4 or saturated salt solution. Lift the sieve and hold over the dish. Push out any remaining solution from the feces.
While mixing vigorously (you may want to put the solution into a flask to prevent spillage) take a sample of the mixture with a pipette and transfer it to one of the chambers of the McMaster slide. Repeat the procedure and fill the other chamber.
Counts done before and after anthelmintic treatment allow you to monitor for drug-resistance. Counts done between scheduled treatments allow you to monitor the worm load and thus allow you to change the treatment schedule if necessary.
Wait 30 sec then count the total number of eggs under both of the etched areas on the slide. Focus first on the etched lines of the grid, then go down a tiny bit, the eggs will be floating just below the top of the chamber. Multiply the total number of eggs in the 2 chambers by 100, this is the eggs per gram (EPG).
The volume under the etched area of each chamber is 0.15 ml (the etched area is 1 cm X 1 cm and the chamber is 0.15 cm deep) so the volume examined is 0.3 ml. This is 1/200 of 60 ml. Since you started with 2 gms of feces and then multiplied by 100, the final result is eggs per gram of feces.
Practical No. 7
Baermannization
In 1917, while working in Java, the Dutch physician Dr. Baermann developed a simple method for isolating nematodes from soil. Today veterinarians use his method for the extraction of live larval stages of nematode parasites from the feces.
1. Place a sieve in a custard dish or other similar container.
2. Spread about 10 grams of fresh feces on a piece of tissue paper and place it into the sieve.
Note: Since you are looking for live larvae, anything which is done to the feces that might kill the larvae should be avoided (i.e. don't let it dry out, don't put it into formalin, don't freeze it, and even keeping it in a refrigerator overnight may impair the larvae's motility).
3. Place warm water* in the custard dish until it just covers the feces, taking care not to disrupt the feces.
5. Lift off sieve and pour liquid into a 50 ml centrifuge tube.
6. Let sit for 20 minutes.
7. Using a Pasteur pipet, remove a drop of the sediment at the bottom of the tube and place it on a microscope slide for examination. (Be careful not to resuspend the sediment before you take a sample from it.)
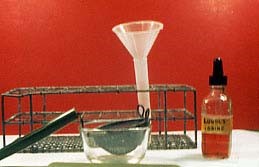
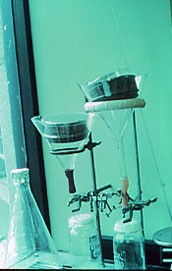
Traditional Baermann set-up
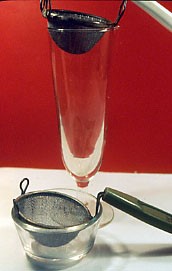
Clinical Baermann set-up
USES: This technique is used to recover larval nematodes for identification. Larval nematodes are normally not numerous in feces and therefore not seen on a direct smear or sedimentation. They are also damaged by flotation solutions, making identification difficult to detect them. This technique makes use of two characteristics of parasitic larval nematode behavior:
*The warmer it is the more active the larva (up to a point: 37 to 400C is as warm as you want to get. You don’t want to cook them!). Also, some nematode larvae are thermotaxic and will move toward the warmer water in the funnel (the surface cools quicker than the middle of the funnel).
Most parasitic larval nematodes are poor swimmers.
Therefore, the following events take place when the sieve is placed in the water:
The larvae will be moving around in a random fashion and within any given time interval some of them will migrate through the tissue and fall into the water. Because they can't swim, they sink to the bottom and over time a number accumulate there. The more active (or themotaxic) the larvae are (i.e. the warmer the water) the greater the number of larvae that will accumulate at the bottom in a given time interval.
**The longer you wait the more larvae will fall to the bottom of the dish, but with time the fecal sample also breaks down, leading to an accumulation of sediment along with the larvae.
Popular Posts
नेपाल कृषि सेवा, भेटेरिनरी समुह, राजपत्रांकित तृतीय श्रेणीको , …
Dec 26, 2023
माछामा लाग्ने एक घातक protozoan रोग ICHTHYOPHTHIRIUS MULTIFILII…
दूधलाई लगातार रुपमा चलाउदै र उमाल्दै यसमा भएको पानीको मात्रालाई आंशिक रुपमा वाष्पिकरण गराएर तयार गरिएको अर्ध–ठोस (Semi solid) दुग्ध पदार्थलाई खुवा भनिन्छ ।
रसबरी छेनाबाट बनाईने मिठाई हो र यसको उद्गम विन्दु भारतको बंगाल राज्यलाई मानिन्छ । नेपालमा यसको लोकप्रियता दिन प्रतिदिन बढ्दो देखिन्छ । गाईको दुधबाट बनेको छेनालाई डल्लो बनाई चिनीको चस्नीमा निश्चित समयसम्म पकाए पछि रसबरी तयार हुन्छ । यसलाई अझै स्वादिलो र वास्नादार बनाउन इलाइची, गुलाबजल आदि थोरै मात्रम